Happy Haunting Shaker Card with Twiddler's Nook and Spellbinders

Saturday, August 31, 2024

It's the last day of the month which means it's Halloween time! It's also the 31st, so we're using Twiddler's Nook products. There is a hop over on Instagram with some of my other crafty friends where we're using Twiddler's Nook on a Halloween cards and I'm so excited to see what everyone else creates. I actually remembered to make sure my camera battery was all set so I have a video tutorial to make this card down below.

I used different embellishments to make my own shaker blend mix and the sentiment and dies are from Spellbinders. This little pup dressed as a ghost with his treat bucket is just the sweetest! My background paper is from Scrapbook.com and I distressed it just a bit with black ink and splatter. The sentiment is a BetterPress Plate, but I used it to hot foil my sentiment instead.

Let me know what you think of my Halloween card and tell me if you hop along with us on Instagram, too!

VIDEO TUTORIAL


PIN THIS
SUPPLY LIST

Read More

Drop In for the New Release from Kindred Stamps

Friday, August 30, 2024

I'm so excited to share the latest release from Kindred Stamps and my next entry in my internship memory book. Well, technically the picture I included on this page is when I was not an intern, but I wanted to include the picture as it's one of the few I have where I'm in full costume. I'm in the back row, third from the right with the peace sign, haha. I will need to make a second page to add in a photo I have sitting on a dusty couch.

To make my projects, I started with stamping the hotel and bellhop three times each and coloring them in. I did my best to mix up the skin tones and hair for my bellhops to show some different combinations. For my card above, I die cut the vintage keys twice in yellow cardstock and layered them on some maroon-ish colored cardstock. I distressed the edges with Aged Mahogany and Black Soot, as well as some gold splatter. My sentiment is embossed and I popped everything up with some foam adhesive.

My memory book layout includes the hotel and bellhop, but I also included the keychain die cuts within the layout. I think my second layout will include more of the keychains because I think it's such a cool die set! Perfect for really any card - not just to mix with this stamp set. 

My last project is a box card! I used black cardstock for the base and added in some patterned paper from the Spooky Hotel pad. The hotel is popped up in the back and I embossed my sentiment for the front of the card. I love how this turned out and honestly, this sentiment is probably my favorite from the set. Make sure to check out the release and let me know what you get!

PIN THIS
SUPPLY LIST

Read More

Happy Hour Holiday Cards with Spellbinders

Thursday, August 29, 2024

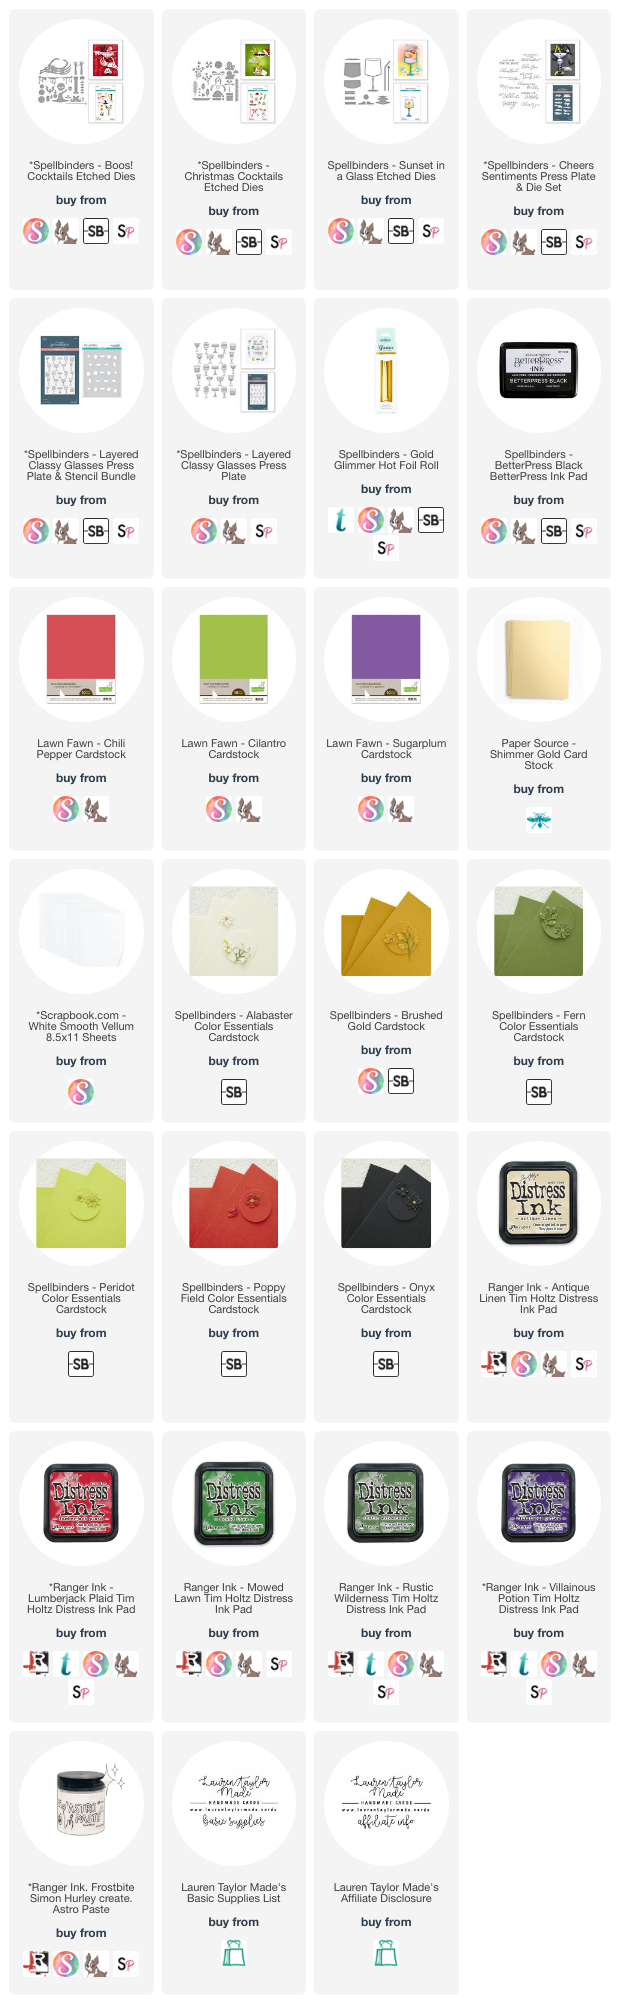
I am a big fan of how my cards turned out using the Happy Hour Collection from Spellbinders! I made two holiday cards - one for Halloween and one for Christmas. Both cards are relatively the same, just a few minor differences. I started with doing all of my die cutting and adding some Distress Ink to give them some dimension. To create the frosty liquid in the glasses, I die cut four of the larger drink shapes out of vellum (two for each card) and added Distress Ink to the back side of the die (so it won't rub off on your fingers when holding the card. 

The items I wanted inside of my glass were glued to the front of the non-inked vellum drink piece and I sandwiched them in by gluing the edges of the vellum pieces together to hide behind the edge of the glasses. Once I was happy with my glasses, I added foam adhesive behind die cut so they would not be seen through the vellum and set them aside to work on my backgrounds.

For the Halloween card, I used the Press Plate with my BetterPress and black ink. I used the coordinating stencil to adding green and purple ink as well as some Astro Paste to give them some shine. The Christmas card is the Press Plate foiled with gold foil! I used the stencil to add red ink to match the holiday cocktail I made with the die cuts.

Once the backgrounds were dry, I used nesting rectangle dies to cut them down and I added a triangle piece of cardstock to the top of the card (this was to help me meet the requirements for last Friday's Craft Roulette). I then layered the cocktail background to a solid piece of cardstock that was attached to my A2 card bases. After popping up my glasses to each card, I used the BetterPress and black ink too make my sentiments and popped them up on the cards as well.

I hope you like these cards - I just love how the drink looks in vellum so you can see the die cut images on the inside!

PIN THIS
SUPPLY LIST

Read More

Merry Mitten Shaker Card for the Holidays with Pretty Pink Posh

Sunday, August 25, 2024

Hi, friends! I am back with a new video using Pretty Pink Posh today. It's the 25th of the month and I wanted to share some non-traditional colors for the Christmas holiday with you! I’m going to be using a mix of different products but this technique can be easily adapted with a different color scheme, shaker die or theme!

I started with doing some die cutting with the Pierced Snowflakes Die with some light teal cardstock. I then cut it down with the largest Stitched Torn Rectangle Die and the Mitten Shaker Die from the center. This will be the front of our shaker panel. I added some white paint splatter and set it aside to dry. Using the Mitten Shaker Die, I cut out the mitten and snowflake out of sparkly white cardstock and the Merry Script Die out of green and purple cardstock for the sentiment of the card.

When the splatter was dry, I added acetate to the back side of the light teal panel and a piece of purple cardstock to the card base to be the “back” of the shaker. You can follow along in my video today to see how my shaker is put together, but I added foam adhesive around the back side of the light teal shaker panel to outline around the mitten shaker opening and the shaker bits on the purple cardstock, then sandwiched them inside by adhering the light teal shaker panel to the front of the card base. My shaker bits were made of Aqua Shimmer Confetti Mix, Purple Shimmer Confetti Mix, and Pastel Party Shaker Beads.

I adhered the white mitten die cuts to the front of the card to finish off the shaker opening. My sentiment was layered together so the purple “merry” creates a drop shadow look behind the green and adhered the sentiment to the card. I hope you had some fun with me today and you’re inspired to get a head start on your holiday card making!

VIDEO TUTORIAL


PIN THIS
SUPPLY LIST

Read More

Spooktacular Halloween Card with Scrapbook.com

Thursday, August 22, 2024

Okay, I'm obsessed with my Halloween card I made! There is a new collection from Scrapbook.com called Willow Lane and there are some gorgeous, vintage Halloween paper along with adorable dies to help you build amazing scenes for your projects. To start your collection, there is a Livestream Bundle today featuring the Willow Lane A2 paper pad and two die sets. I did use a freebie die set called Spooktacular for my sentiment - make sure to add it to your cart before you check out!

You can follow along how I made my card in today's video below, but I did all of my die cutting from the Willow Lane A2 paper pad (and a little vellum) and assembled my scene. I adhered my card front to an A2 card base, splattered some white ink and added a few Pops of Color in Black Gloss. I just love how it turned out - the vintage orange color just makes me so happy. Let me know if you get the bundle!

VIDEO TUTORIAL


PIN THIS
SUPPLY LIST

Read More

Hello Baby Pups Card with Pretty Pink Posh

Wednesday, August 21, 2024

I'm going to be an Auntie again and I wanted to share a fun baby card to celebrate! I'm using products from Pretty Pink Posh to make this sweet onesie filled card. I stenciled the Layered Onesies Stencils on white cardstock. I used Catherine Pooler Inks with the (A) stencil in Lime Rickey, All That Jazz and Something Borrowed. For the (B) stencil, I used Beluga Solar Paste and set it aside to dry.

Next I stamped and colored my images from the Baby Animals Stamp Set as well as my sentiment. I used the Baby Animals Coordinating Dies to cut out the images and “Baby” sentiment. I cut the third Eyelet Heart Die out of teal cardstock and used the images as a guide to stamp “Hello” onto the heart. I cut down my stenciled background to 4-⅛x5-⅜” and used a corner rounder. I used the same corner rounder on my A2 white card base and I adhered the background to the card.

I popped up the heart, images and sentiment to my card base. I love the subtle shine from the Layered Onesies and the adorable dog images. I’m so excited for the new baby to be here! 

PIN THIS
SUPPLY LIST

Read More

Sunshine & Smiles Hot Foiled Poppies Card with Spellbinders

Tuesday, August 20, 2024

It's one of my favorite days of the month! Time for another Oh So Inspired Collaboration Hop featuring a beautiful card from Lorraine Cich. I loved the colors and pop of gold from our inspiration piece, so that is what I'm going to use as my inspiration for my project today. You can follow along in my video that I have embedded down below, but make sure to watch over on YouTube so you can get all the details of how to hop along with with my crafty friends to see what they have made with the inspiration card.

My card uses a BetterPress Plate but it's foiled in gold to give the background some major shine! The poppy design has a coordinating stencil set, so it made coloring in the poppies SO EASY. I am obsessed with beautiful florals and coordinating stencils - makes it so easy to color and look so beautiful. I added a fun sentiment and a few gems to finish the card! Let me know what you think of my take on this month card and if you hopped along with us in the comments.

VIDEO TUTORIAL


PIN THIS
SUPPLY LIST

Read More

Make Your Day Fandom Birthday Card with The Sassy Club

Sunday, August 18, 2024

Another week, another Craft Roulette submission! I am sitting and waiting to start my live class for Firefly Farm's Creative Crate using Pretty Pink Posh (it's my first solo live so I'm a bit nervous) so I thought I would work on my project for Friday's night's episode to help pass the time and hopefully be less nervous. When I saw the Monday parameter, I knew I wanted to incorporate this Sassy Club stamp set!

I started with stenciling my checkered background with Distress Oxides and Picket Fence Distress Ink on a yellow piece of cardstock. I used a nested rectangle die set to cut it down as well as piece of vellum and orange cardstock so that they would all layer neatly together.

I stamped my sentiment in black VersaFine ink and embossed it with clear embossing powder. Then I stamped my images and colored them in with alcohol markers. Since all of my items for the live class were sitting prepped in front of my Scan N Cut, I decided to just fussy cut out the images to a void having to move things...

Finally, I layered my checkered background to my card base as well as the orange rectangle to the piece of vellum. I popped up the vellum to the card base and used foam adhesive to pop up my images as well. I felt like the card was missing a little something, so I added for dots of Pops of Color around the corners of the vellum to bring in more of the darker orange.

I hope this birthday card brings a smile to your face and let me know in the comments if you think I met the parameters for this week's episode of Craft Roulette!

PIN THIS
SUPPLY LIST

Read More

Floral Cards with August 2024 Spellbinders Clubs

Saturday, August 17, 2024

I have a bit of a longer video today - I'm using the rest of the Spellbinders Clubs that I receive as part of the Influencer Team to create two, floral cards. This video features the Stencil, Clear Stamp & Die, 3D Embossing Folder, Die and Stitching Die of the Month Clubs! If you would like to know how I made my cards today, just scroll down a bit and you can find my video embedded for you to watch. 

The first card above is probably my favorite of the three that I made this month (you can find my first one from the YouTube Live here). I love the Stencil and I think it coordinates really well with the Clear Stamp & Die of the Month. My second card I wanted to use the Stitching Die in a different way than intended with the die set. I thought it would be fun to use the stitched rectangle shapes as a border along the bottom of my card instead of as a paint palette. 

Let me know down below in the comments which card is your favorite from August - either of the two above or the BetterPress card I made earlier this month with the Clear Stamp & Die and Embossing Folder of the Month Clubs, too.

VIDEO TUTORIAL


PIN THIS
SUPPLY LIST

Read More

Sending You Sunshine - Cards for Kindness with Scrapbook.com

Thursday, August 15, 2024

It is Cards for Kindness week at Scrapbook.com and they're celebrating with a FREE Livestream Deal today! You can get the Cards for Kindness Sunshine stamp set today - for FREE! I used it along with some other Scrapbook.com Exclusive products to create a blue and yellow, sunshine-y card that I think would bring a smile to anyone's face.

I started with die cutting A2 nested rectangles out of Charming Patterned Paper. I also die cut vellum and a piece of White Mixed Media Paper. Using the Large Checkered Stencil, I added blue and yellow ink as well as some Spring Flowers Rub-Ons in silver along the sides.

After stamping my images, I used the coordinating dies to cut them out and layered my card together. I used 1mm foam adhesive between the stenciled background and vellum, as well as to attach my stamped images. To add in some more silver, I used Pops of Color in Silver Glitter on the blue patterned paper. I think the small smile on the sun is my favorite part of the card!

Let me know if you snag this deal today - I mean, how can you not when it's FREE!

PIN THIS
SUPPLY LIST

Read More