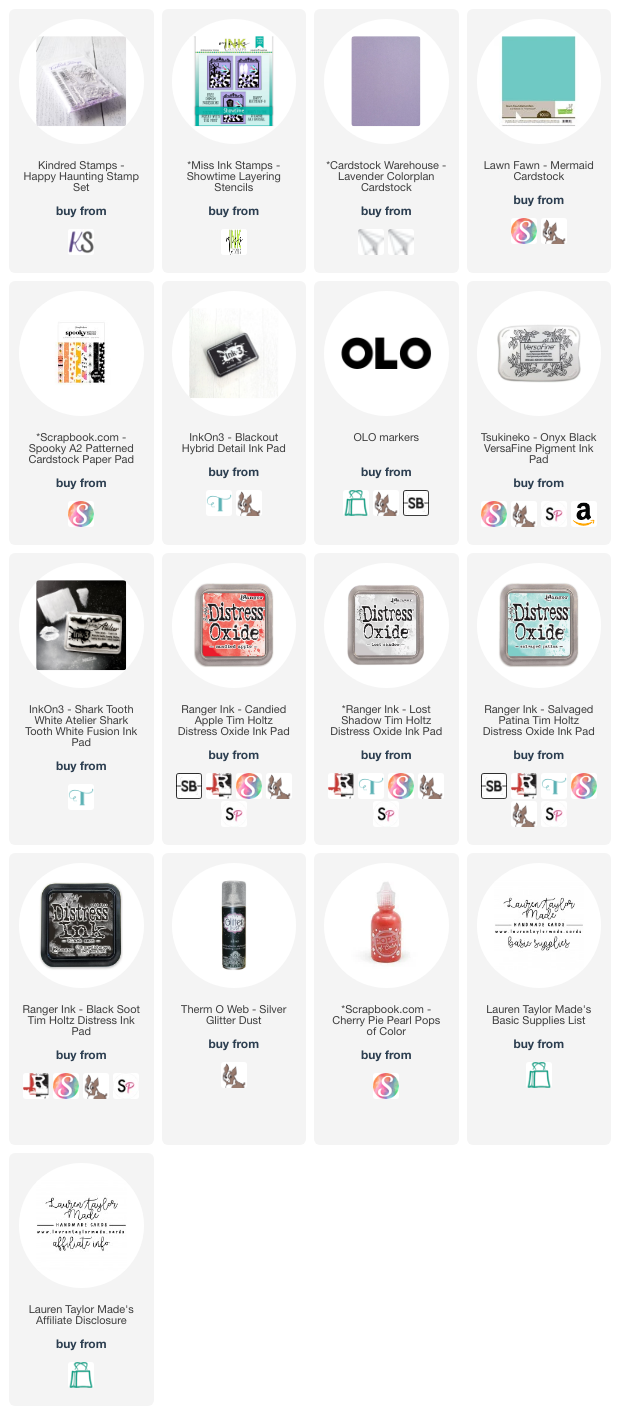
Giant Spider Card with Miss Ink Stamps - Fandom Friday!

Friday, March 7, 2025

Hey, crafty friends! Today I’m sharing a fun and slightly spooky card featuring the Miss Ink Stamps Magic Collection. I used the Fangtastic stamp set, its coordinating dies, and the Spiders stencil to create a layered design that’s perfect for any fan of magical creatures. The background comes to life with a blend of Distress Oxides in Antique Linen, Spiced Marmalade, and Rusty Hinge, plus a touch of brown watercolor splatter for added depth. The sentiment Why is it always spiders? ties the theme together, and I love how it all came together with a mix of dimensional layers and bold, hand-colored spiders!

If you want to see exactly how this card was made, including my alcohol marker coloring techniques, be sure to check out the full video tutorial! I walk through every step, from stenciling to splattering, stamping to assembling, so you can recreate this look with ease. Head over to my YouTube channel for all the crafty details, and don’t forget to subscribe for more paper crafting inspiration. Happy crafting!

VIDEO TUTORIAL


PIN THIS
SUPPLY LIST

Read More

Cheesiest Birthday Card for Craft Roulette

Wednesday, March 5, 2025

This week’s Craft Roulette challenge had me stepping out of my comfort zone in the most delightful way—creating an A7 sized card! I took this as the perfect excuse to finally crack open some long-neglected supplies in my stash. The A Little Latte Designer Series Paper from Stampin’ Up! made the perfect rustic background, and I gave it a decorative edge with the largest Admit One A7 Layer die from Popsiclesticks.

To build the card, I made my own A7-sized card base and adhered the background panel. Then, I reached for Avery Elle's Char-Cute-Rie stamp set (which had been sitting patiently in my collection) and stamped both of its beautiful wooden boards onto Desert Storm cardstock using Crunchy Leaf Lawn Fawn ink—perfect for that warm, natural tone. Coloring with my OLO markers brought the boards to life, and I gave them a crisp, finished look by stamping over them again with Pinecone VersaFine Clair ink before cutting them out with the coordinating dies.

Of course, a charcuterie board isn’t complete without delicious treats! I used the dies to cut out an assortment of cheese, crackers, and other goodies from white cardstock and colored them with my OLO markers, blending soft yellows, warm browns, and olive greens to make them pop. Once they were all ready, I carefully arranged and adhered them onto the wooden boards, making sure to create that perfect balance of savory and sweet.

To finish off the card, I added some stamped hearts and a punny sentiment in Warm Breeze VersaFine Clair ink—because what’s a charcuterie card without a little cheesy humor? I love how this card turned out, and I’m so glad I finally put these products to use. If you’ve been hoarding some new (but unopened) supplies, let this be your sign to break them out and get crafting! Let me know in the comments—what’s the last new-to-you product you finally used?

PIN THIS
SUPPLY LIST

Read More

Confetti Cake Shaker Card with Pretty Pink Posh - New Release!

Tuesday, March 4, 2025

Are you ready to create a festive and fun handmade birthday card? I had an absolute blast playing with some of the newest Pretty Pink Posh products, and I can't wait to share my latest card with you! This card features the Pierced Stars Plate Die, Layered Garland Stencil, and Cake Slice Shaker Dies, along with a beautifully foiled sentiment that brings everything together. The mix of Peacock Feathers and Twisted Citron Distress Oxide inks, plus a pop of shimmer from Prom Queen Simon Hurley Lunar Paste, creates a lively and dimensional background that’s perfect for any birthday celebration. If you love interactive elements, you’re in for a treat because the Cake Slice Shaker Die adds an extra layer of excitement with fun Party Time shaker beads!

To make this card, I started by die-cutting a piece of white cardstock using the Pierced Stars Plate Die to create a subtle yet elegant texture. Next, I used the Layered Garland Stencil with Peacock Feathers and Twisted Citron Distress Oxide inks, adding Prom Queen Lunar Paste for a touch of shimmer. While that dried, I hot foiled the Happy Birthday Script sentiment using bright pink glimmer hot foil on pink cardstock and die-cut it with the coordinating shadow die. For the cake, I cut the Cake Slice Shaker Die from vanilla, brown, and white cardstock. I added shading with alcohol markers to create a pink-and-white striped candle and a glowing yellow flame. Using partial die-cutting, I created a chocolate frosting top, then assembled the shaker with acetate and Party Time shaker beads for a fun, interactive element. Once everything was ready, I adhered the stenciled background to an A2 card base, placed the shaker cake in the center, and attached the foiled sentiment on top!

If you’re as excited about these new Pretty Pink Posh products as I am, make sure to hop along with us on Instagram to see even more inspiring projects! You’ll find endless creative ideas from amazing designers, and there’s even a chance to win a Pretty Pink Posh gift card—you won’t want to miss out! Let me know in the comments what your favorite product from this release is, and happy crafting!

PIN THIS
SUPPLY LIST

Read More

Spooky & Sweet - PEZ Inspired Halloween Card with The Sassy Club

Saturday, March 1, 2025

Yesterday was the last day of the month, but we're still getting into the Halloween spirit today because it’s never too late for a spooky-sweet creation! I had an absolute blast crafting this Halloween-themed card LIVE on YouTube with my amazing crafty friends. If you missed it, don’t worry—you can still catch the replay and craft along with me! I used The Sassy Club’s Pez Friend stamp set to create a fun and nostalgic design featuring adorable Pez dispensers with a magical mouse and ghostly twist. The vibrant Pez candies and shimmering Halloween Town frame add just the right mix of cute and creepy, perfect for celebrating the season!

To make this card, I started by stamping images from Pez Friend in Onyx Black ink, while the tiny Pez candies got a pop of color with Sassy Club inks in shades of Citrus Green, Summer Green, Lavender, Marigold, and Fuchsia. After coloring with OLO markers and fussy cutting, I layered a plaid patterned paper from Scrapbook.com’s Woodland paper pad onto an A2 card base. The Halloween Town frame die (cut from glittery charcoal cardstock) set the perfect spooky scene. I arranged the Pez dispensers—made using magical mice ghost heads—along with colorful Pez candies and a tiny bat, securing everything with liquid glue and foam tape for dimension. Sentiments stamped in Nocturne VersaFine Clair ink completed the card, with a few extra Pez candies inside for a fun surprise! Want to see all the details and craft along? Watch the replay of the live stream and join in on the crafty fun anytime!

VIDEO TUTORIAL


PIN THIS
SUPPLY LIST

Read More